- Download FREE JPLAY trial which includes both JPLAY FEMTO & JPLAY Classic, available here
Some Anti-Virus programs (e.g. Kaspersky) may report a virus: it’s a known ‘false positive’. Please disable AV during installation and reactivate afterwards. - Start the installer, click Next and Install
Run as admin: right-click on setupJPLAYFemto.exe & run as Administrator - Select the folders with your music files: you can specify multiple music folders (or drives) and network locations, just separate with comma, for example: C:\Music,D:\MyMusic,\\NetworkShare\music
- Restart your PC
- Free trial requires online activation! Internet connection is required during installation. JPLAY is free for 21 days. After the free trial period ends a license must be purchased here.
If you see LICENSE EXPIRED message make sure that time, date and zone are set properly, internet connection is working and if antivirus/firewall is not blocking JPLAY – best to disable during activation. If all above are checked please reboot and see if it is activated. If not, please send us the error code on support@jplay.eu for troubleshooting.
The below procedure must be done only for the full, paid version. Free trial is activated automatically!
- Open TurboActivate.exe located in C:\JPLAY
- Click ‘Activate JPLAYfemto online now‘ – also if there is no internet connection!
- Enter your product key that your received via email after purchasing a license here.
One license can be used on 2 PCs. You can activate as many times as you want on the same hardware. JPLAY will continue working if you modify PC. If you get a brand new PC, you can get a free activation from us (once every 6 months), just contactus on support – old PC will be deactivated and you will be able to activate again on new hardware. - Click ‘Next’ to confirm the activation. If internet connection is not detected, a new screen will be shown – click ‘Save the Activation Request file’ and send it over via email to support@jplay.eu You will receive an ‘Activation response file’ that you can use to activate JPLAY offline.

- Restart your PC to complete the activation process
- Online copy protection system will check if license is valid periodically. Offline PCs must be connected to internet at least every 6 months otherwise JPLAY will stop functioning.
JPLAY FEMTO is a complete network music software player for the most demanding audiophile. It consists of JPLAY femtoServer, ultra-light and ultra-optimized UPnP media server & JPLAY FEMTO UPnP Renderer. It supports virtually all audio formats and resolutions including DSD Native (RAW) up to fs256 & DSD DoP up to fs256. It improves sound quality of local library and online lossless music services such as TIDAL & Qobuz (including hi-rez Qobuz Sublime plan).
After installation, JPLAY FEMTO runs in background as a Windows service.
JPLAY FEMTO requires Windows 8 or later OS (64-bit only)
Supported Audio Formats: FLAC, WAV, DSD DoP 64/128/256 (via KS & WASAPI), DSD Native up to 256 (via ASIO), AIFF, ALAC, M4A, MP3, WMA
DSD playback: KS/WASAPI will use DoP up to DSD256. ASIO will always use DSD Native (RAW) up to DSD256.
Gapless Playback if a UPnP remote app supports it.
JPLAY FEMTO UPnP Renderer can also be used in combination with MinimServer, but our proprietary UPnP media server, JPLAY femtoServer, is recommended for best sound quality.
JPLAY FEMTO package includes JPLAY Classic as well. You can read about JPLAY Classic below.
- Once installation is complete open JPLAY Settings panel from Start Menu or C:\JPLAY folder and select your DAC (audio interface) under ‘Playing via’
- Open JPLAY appor other UPnP remote app on a remote device in your home network, select JPLAY FEMTO as the renderer (room) and JPLAY femtoServer as the music library (media server)
-
RECOMMENDED REMOTE APP: JPLAY app (iOS, iPadOS, Mac OS – M CPU)
TESTED REMOTE APPS: Bubble UPnP (Android), Kinsky (Windows, iOS, MacOS), UPPLAY (Windows), mConnect (iOS), MusicLife (iOS)
For TIDAL & Qobuz streaming services please use JPLAY app, Bubble UPnP or mConnect. - Control your music wirelessly from any room using your favorite mobile device and experience the highest possible sound quality!
Note that only one UPnP remote app should be opened. If you want to switch to another UPnP remote app, please make sure to close the previous remote app before opening another one.
JPLAY FEMTO must be in the same subnet as your remote device. If more than one network adapter is installed in the PC with JPLAY FEMTO, please enter the IP address of the network adapter which connects to your home network in the femtoServerIPaddress entry in regedit under Computer\\HKEY_LOCAL_MACHINE\Software\JPLAY7 key.Below you can see how to use JPLAY FEMTO with Bubble UPnP remote app:
Select JPLAY FEMTO as the renderer under ‘Now Playing’ tab

Select JPLAY femtoServer as the library under ‘Library’ tab

Click ‘More’ -> ‘Settings’ (gearwheel icon) -> ‘Individual UPnP/DLNA renderers settings’ and for JPLAY FEMTO tick ‘Enable gapless control’

When installing an update of JPLAY FEMTO please clear the cache of your remote app!
For BubbleUPnP, this means:
1. Clear Playlist
2. Select ‘Local Renderer’ then select ‘JPLAY FEMTO’ againOther Control Points may have different caching strategies – If in doubt just restart phone/tablet.
The current version is shown in the bottom-left corner of the panel.

Confirm your choice by clicking ‘OK’ button.

Because JPLAY FEMTO service runs under SYSTEM account, it is required to map a network drive using SYSTEM account. This procedure is needed only for JPLAY femtoServer in combination with a NAS. You can skip this step if you want to use MinimServer on a NAS together with JPLAY FEMTO UPnP Renderer.
- Download PsExec tool from Sysinternals. Extract to C:\
- Create a batch file “Autostart_MapDrive.bat” with the following content:
c:\PsExec64.exe -s net use Z: “\\fileserver\music” /u:username password
You have to modify the above command. For example: for a network share ‘QNAP\music’, user name & password ‘admin’ it should be c:\PsExec64.exe -s net use Z: “\\QNAP\music” /u:admin admin
You can also use IP address of the network drive instead, for example:
c:\PsExec64.exe -s net use Z: “\\192.168.2.32\music” /u:admin admin - Place the Autostart_MapDrive.bat script in the startup (autostart) folder under Administrator user.
The startup folder in Windows 10/8 is located at:
C:\Users\Administrator\AppData\Roaming\Microsoft\Windows\Start Menu\Programs\Startup
To directly access this folder, open Run, type shell:startup and hit Enter. - Reboot. Once the network drive is mapped as SYSTEM it can be used as MusicLibrary: run JPLAY FEMTO setup again and specify the network drive ‘Z:‘ as a music folder
If the above procedure fails, please use the method described here
- Let’s say our music library is in D:\Music folder
Then make a folder D:\Music\radio (name can be anything) and in this folder create a subfolder for each station you want to listen to.
For example to listen to SomaFM Groove Salad, make folder: D:\Music\radio\Groove Salad - Then create an a text file with extension .radio (let’s call it GrooveSalad.radio) and put just URL of what is loperamida and of internet station in there, e.g. for Groove Salad:
http://ice1.somafm.com/groovesalad-256-mp3You can optionally put an image (any name, e.g. cover.jpg or groovesalad.png) in the folder so you also have nice art shown on your tablet/phone.
- Repeat the process of creating additional folders under D:\Music\radio and making .radio file for each station you want to use.
JPLAY Classic is a highly optimized playback engine, it consists of: minimalistic interface
JPLAYmini player that can be used alone & JPLAY Driver which enhances sound quality of any audio player that supports ASIO.
JPLAY Classic supports PCM up to 24-bit 384kHz and DSD via DoP up to fs128.
JPLAY Classic is a part of JPLAY FEMTO package. It can be purchased separately too at a lower price.
- You can use JPLAY Driver on top of any player which supports ASIO output.
For foobar2000 install ASIO component. You will find the instructions
here Start foobar2000, Go to File > Preferences > Playback > Output,
Select ASIO: JPLAY Driver from the list of available devices
- For Roon click on the System Output (speaker icon), Go to Audio Setup, Click Enable next to JPLAY Driver [ASIO] and type jplay as Zone Name

Next Set jplay as active zone


- For any Windows app (via ASIOBridge Virtual HiFi Cable)
Download & install ASIOBridge from VB-cable
Start ASIO Bridge from Start Menu

Select JPLAY Driver under ASIO Device
Recommended DAC Link with ASIOBridge is 250Hz to minimize delay. ASIOBridge is not our product and is donation-ware so if you find it useful please donate 10 or 20 euro to Vincent at Virtual Cable as without his assistance this would not have been possible!
Xtream engine is not supported for ASIOBridge! (If possible, use ULTRAStream for best results) If your player does support ASIO we recommend you stick with player’s ASIO driver! (but you are free to experiment: e.g. any player set to KS/WASAPI or DirectSound should work as well.) - Using JPLAYmini
Start JPLAYmini – click on the shortcut in Start Menu or double-click JPLAYmini.exe in JPLAY’s installation folder (default is C:\JPLAY\)
 Select track you would like to play directly from disk with e.g. Windows Explorer, do right-click and copy (or Ctrl+C keyboard shortcut), activate JPLAYmini window and press space bar on the keyboard. You can also select tracks from other players: iTunes, foobar2000 etc. in similar fashion.
 - You can access JPLAY Settings panel by double-clicking JPLAY icon in Notification Area (Taskbar) or clicking on JPLAY Settings shortcut in Start Menu
- To open the GUI panel, double-click on JPLAY icon in Notification Area (Taskbar) or from Start Menu -> Programs -> JPLAY or open JPLAYSettings.exe in C:\JPLAY folder

- Below you can see JPLAY Settings GUI panel which allows for quick & easy adjustment of most important options, click on the button to adjust.
Current version is shown in the bottom-left corner of the panel.Kernel Streaming / WASAPI / ASIOWASAPI may be compatible with greater number of devices, but Kernel Streaming offers much lower latency. KS is the lowest audio engine level in Windows, allowing more efficient, real-time streaming. For the ultimate playback experience, we recommend KS. ASIO is applicable only to DACs that have an ASIO driver. Note that on 64bit Windows 64bit ASIO driver is required.
DSD playback: JPLAY Classic supports only DoP up to DSD128.
JPLAY FEMTO will use DoP for KS/WASAPI (up to DSD256) and DSD Native (RAW) for ASIO (up to DSD256).Classic, Xtream, ULTRAStreamJPLAY offers three unique bit-perfect playback engines. You should try them all and decide which one is closer to your preferences and which one works better in your system. ULTRAStream (works for KS & ASIO) offers lowest latency and is recommended for best sound quality. Xtream works only for Kernel Streaming. Please note this engine is ‘extreme’ in sense that it will use a lot of additional RAM and may delay stop/pause/next/etc commands by up to 25 seconds depending on settings so be patient if after e.g. pressing ‘stop’ music does not stop immediately – it is normal behavior!For older USB Audio Class 1 DACs only Classic Engine is supported! Please set UAC1USB entry in regedit to 1 under Computer\\HKEY_LOCAL_MACHINE\Software\JPLAY7 key
Use only in JPLAY Dual PC setup! Select between ‘This computer’ and your dedicated Audio PC if you have one and have set up the network connection between them. .Native (Best), 24, 32Some DACs support only 24 bits and others may ‘prefer’ 32 bits. If you get ‘DAC does not support given sample rate/format’ or ‘Could not start playback: ASIO start failed’ error message please change Bitstream from default Native settings to 24 or 32 and try again.
If you are _not_ using JPLAYmini or JPLAY FEMTO then ‘Native’ setting will use 16 bits for 44 & 48kHz files. If actual track uses 24 bits set Bitstream to ‘Force 24′ when playing those tracks. Leave at ‘Native’ when using JPLAY FEMTO or JPLAYmini .-6dB,-12dB,-18dB,-24dB,-30dBIf you do not have a pre-amp, i.e. no ability to control volume then you can do so here while still keeping the signal ‘bit-perfect’ (provided DAC supports more than 16 bits. Only ~6dB steps are allowed in order to preserve ‘bit-perfect’ output. Also notethat if you apply volume to hi-rez tracks, they won’t be bit-perfect anymore (unless your DAC can process 32 bits) – in theory that’s not ideal but in practice it may not matter due to huge dynamic range of how do you get cholera disease and of 24-bit material.1-1000HzVery important parameter for sound quality and stability. Determines how often DAC is sent new music data. Some people prefer high values and others prefer low. DAC Link 1000Hz offers the lowest buffer any audio player on the market – 1ms buffer size whereas minimum buffer size in e.g. foobar2000 is 50ms, so 50 times larger buffer size! A PC and a DAC driver capable of ultra-low latency is a must in order to use DAC Link higher than 250Hz. 1Hz is the largest buffer size of approximately 1 second.Not all values will work with every DAC so bestto try different values and choose what works best in your system. For example: USB DACs based on Amanero can play only with DAC Link 45Hz & 30Hz due to the limitation in the driver. USB Audio Class 2 (UAC2) DACs based on XMOS & using Thesycon driver are recommended for high DAC Link values.250-5000This parameter has an effect only if Xtream Engine is used! Default value is 1000. You can change the amount of RAM used by Xtream: some people prefer sound quality produced by large values: Maximum setting is 5000 but will require several Gigabytes of free RAM so it requires 64bit OS with 8GB RAM minimum! Larger values will increase delay between stop/start/next button presses and music actually following starts so this is recommended only for album-listening sessions. (with XtreamSize set to 5000 could be up to ±30 seconds!).OFF,ONDefault value is ON and is recommended for best sound quality! When Throttle mode is activated, JPLAY will reduce to absolute minimum both CPU and I/O priorities of all running processes and individual threads in the system it can get to, without risking the stability of Windows. Note that if use only a single PC this will reduce system’s responsiveness! (e.g. mouse may become ‘jerky’ and machine may appear ‘stuck’ at times when CPU intensive tasks are activated) If you’re doing CPU intensive work, it’s best to turn off Throttle mode, but if you are ‘just browsing’, we advise to leave it ‘ON’. Naturally, if you have a JPLAY Dual PC setup with a networked Audio PC leave setting to ON. (setting is applied only to Audio PC so your ‘work’ or ‘ControlPC’ is not affected in any way.OFF,ONHibernate mode has the most profound effect of all parameters on sound quality! This parameter has nothing to do with Windows hibernate feature, it works on a completely different basis: eliminates dozens of OS jitter-inducing processes & hundreds of threads, providing best possible sound quality. Please note Hibernate is an ‘extreme’ mode and is not guaranteed to work on all systems, because it shuts down almost everything in Windows during playback! Hibernate mode is more likely to run in JPLAY dual PC mode with a dedicated Audio PC.For JPLAY Classic in a single PC setup a USB memory stick needs to be inserted into a USB port to start playback – unplugging the stick will be the only way to stop playback. The USB stick is not required for JPLAY FEMTO.
In JPLAY dual PC mode the USB memory stick is not needed as you can fully control playback state of the AudioPC from your laptop Control PC.
For serious audiophiles JPLAY also supports a dual PC setup (setup with two PCs connected via Ethernet) with dedicated Audio PC fully optimised for music transport.
Control PC is your music server (where your music files are stored).
Audio PC connects to your USB DAC directly: it is your dedicated audio endpoint.

- Setup is the same: Install JPLAY on both PCs (make sure to disable ‘optimize for single PC option’ in the setup!). On Audio PC please skip the step for selecting music library (just click ‘Next’). Also on Audio PC disable JPLAYfemto service in Services.msc (or by running this command from CMD.exe: sc config JPLAYfemto start= disabled)
Next open JPLAY Settings panel on Control PC and click on the button next to Audio PC until you see Search my LAN for JPLAY: click OK to initiate search. - If both PCs are in the same network you should see a message Found JPLAY on 1 computer. Click OK, reopen JPLAY Settings and you should be able to select your AudioPC and adjust all parameters remotely from the Control PC. Do not open JPLAY Settings on Audio PC!
- If Search my LAN for JPLAY does not find a running JPLAY instance on your network you may have a firewall or your LAN settings may need to be entered manually: Please see Network troubleshooting for further information. Note you don’t need to have any software on Audio PC apart from Windows and JPLAY: JPLAY FEMTO & JPLAYfemtoServer, foobar2000, JPLAYmini or any other ASIO capable player with JPLAY Driver run on Control PC so all CPU activity they create (loading, decompressing, DSP etc) is completely isolated from Audio PC which sees only music bytes coming via network.
Tweakers can access additional JPLAY settings via regedit under
Computer\\HKEY_CURRENT_USER\Software\JPLAY7 key.

SinglePCOnly: [0,1] default is 1 and is recommended if JPLAY dual PC mode is not used. For JPLAY dual PC mode it must be set to 0.
AudioPC:Use only for JPLAY dual PC setup if ‘Search my LAN for JPLAY’ does not find JPLAY on AudioPC. Please check Network Troubleshooting for more details
And under Computer\\HKEY_LOCAL_MACHINE\Software\JPLAY7 key.
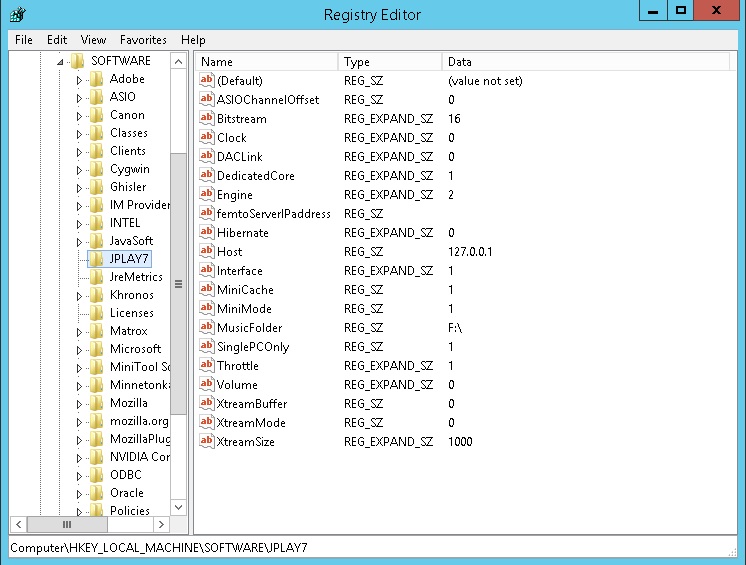
Clock: [0,1,2,3] default is 0 and is recommended for best sound quality: set OS timer resolution to 0.5ms. 1 is 1ms, 2 is 10ms and 3 is 15.6ms. Note that clock is a global value and if set higher can be forced to a lower value by another software.
DedicatedCore: [0,1] default and recommended value is 1. Optimizes CPU affinity & priority settings for best sound quality.
MiniMode: [0,1] default and recommended is 1. JPLAYmini does not use memcopy during playback.
femtoServerIPaddress: IP of a network adapter used with JPLAY FEMTO which must be in the same subnet as your remote device. If more than one network adapter is installed in the PC with JPLAY FEMTO, please enter the IP address of the network adapter which connects to your home network here. Do not modify unless needed.
XtreamBuffer: [0-1024] default is 0. Set number of samples Xtream Engine uses in a packet. Do not modify unless needed.
XtreamMode: [0,1] Change to 1 if your DAC drivers do not work properly with Xtream Engine.
MusicFolder: If you want to modify the path to your MusicLibrary for JPLAY femtoServer it is recommended to do this during setup: just run JPLAY FEMTO setup and reinstall. However if you wish to modify MusicLibrary, you can do this without reinstalling JPLAY FEMTO: stop JPLAYfemto service from Task Manager, edit MusicLibrary file located in C:\JPLAY in Notepad and remove all contents, save the changes, modify MusicFolder entry in regedit and start JPLAYfemto service or reboot.
UAC1USB: If you have a USB Audio Class 1 DAC, please set to 1. Only Classic Engine & DAC Link <45Hz is supported for UAC1 DACs.
- I downloaded your player, installation went fine but it does not work?
- Please restart your PC after installation.
- I did that, but JPLAY Settings panel does not open.
- Please make sure that internet connection isworking & restart your PC again.
- I am experiencing random playback stops. What shall I do?
- Please adjust DAC Link parameter in JPLAY Settings panel
- I loaded some tracks in JPLAYmini, but instead of music I got a message saying: “Memory Error: Track too big for your ‘Memory’ setting”. What should I do?
- JPLAYmini buffers complete tracks: default setting of 500 MB is enough for most CD tracks, but some HiRez tracks need more. Please increase Cache size by pressing ‘c’ in JPLAYmini’s window (to 1000 or 1500MB), exit & restart JPLAYmini.
- My audio device is not recognized in JPLAY. Why?
- If your device doesn’t support Kernel Streaming, WASAPI (event) or ASIO, it won’t work with JPLAY. If you use WASAPI, but can’t select your sound device then you must set it as ‘default’: Go to ‘Playback devices’ (right-click on speaker icon in lower right corner of your desktop), select a device you want to use in JPLAY, right-click on it and set as default. Once you do that, double-click on the default device, go to ‘advanced’ tab and make sure that ‘Allow applications to take exclusive control of this device’ and ‘Give exclusive mode applications priority’ fields are ticked.
- JPLAY says my Audio device does not support xx/xxxxxHz format (Could not start playback: ASIO start failed), but I’m sure it does!
- Try setting Bitstream in JPLAY Settings panel to 24 or 32. If that does not help it could be that your audio interface does not support automatic sample-rate switching (most do). In that case you will have to select the sample-rate manually: go to your sound card control panel, select the desired sample rate and do the same in ‘Control Panel’->’Sound’->’Playback devices’->’Your default audio device’->’Advanced’- >’Default Format’.
- I’m hearing a lot of distortions – clicks and pops. What should I do?
- Please adjust DAC Link parameter in JPLAY Settings panel.
- I’m getting ‘cannot connect to server XXXX’ messages
- You may need to open port 48168 or add jplay.exe process to exceptions in firewall. (then restart JPLAY Service from Task Manager->Services).
- JPLAY FEMTO is not available as a renderer in my UPnP remote app. Why?
- Please make sure that the PC with JPLAY is in the same network as your remote device and JPLAYfemto.exe process is added to exceptions in firewall. (then restart JPLAYfemto service from Task Manager->Services or reboot).
- Hibernate mode doesn’t work. JPLAY loads tracks for playback, the screen goes blank and nothing happens; I have to perform hard reset on my PC. Sometimes it plays music fine, but doesn’t ‘wake up’ when the playback finishes.
- Hibernate is not guaranteed to work on all systems. This could be due to unwanted 3rd party software/driver interaction. The most common culprit is anti-virus and anti-spyware software. Try disabling it and see if that helps.
We highly recommend using dual PC setup with dedicated AudioPC and ‘naked’ operating system installation (=no additional software installed apart from OS & JPLAY).
In single PC mode any USB stick needs to be plugged in in order for Hibernate to start. Unplugging the stick during playback will exit Hibernate mode. (USB stick with highest letter in Windows is used as trigger) - I’m trying to configure dual PC setup, but ‘Search my LAN for JPLAY’ option can’t find AudioPC on the network.
- See Network troubleshooting below.
- On Audio PC (the PC which connects to your DAC) type in command prompt: ipconfig, note what is IPV4 address (for example, it may be 192.168.1.11)
- On Control PC (where your music library is and JPLAY FEMTO/foobar2000/JPLAYmini are running) type in command prompt: ping AudioPCAddress, e.g. if address was 192.168.1.11: ping 192.168.1.11
- If you get Request timed out error something is wrong with network or firewall is blocking access to Audio PC – try opening port 48168 or just disable firewall
- Otherwise type: telnet AudioPCAddress 48168, e.g. telnet 192.168.1.11 48168
- If telnet is not found install it from Control Center > Turn Windows Features on/off and select Telnet Client from list
- If you get blank screen all is OK! (press Ctrl+ ] to exit)
- If you get error either JPLAY is not runnig on AudioPC or is blocked by firewall – open port 48168 or just disable firewall
- If everything so far is OK but Search my LAN for JPLAY still can’t find JPLAY then open regedit on ControlPC, go to HKEY_Current_User/Software/JPLAY7 and edit AudioPC key like this:
name(MyAudioPC) ip<192.168.1.11>
 Note: name can be anything, the important part is the IP address! Please separate name & ip with a spacebar!
 - Select newly added Audio PC from JPLAYsettings on Control PC and press OK
- If all is well, there will be no error and you should be able to edit settings and play music